Thursday, December 12, 2013

5th Day of Christmas Cookies: Katie's Sugar Cookie Cutouts with Royal Icing

 It's the 5th day of the 12 Days of Christmas Cookies and, 
I can't even tell you have excited I am for this post. 
I have been since I received the photos a few days ago.


 My dear friend and matron of honor Katie is so creative! 
In fact she is the owner of Katie Hall Creative
her own photography business 
(you'll be able to tell that from the cookie photos). 

Katie is someone I have looked up to since we became friends 
when I was in college, and I am so grateful to her for sharing this recipe!

Katie, and her beautiful family.

************************************************************

Sugar Cookie Cutouts with Royal Icing


Shopping List:

3 C All-purpose Flour
2 tsp Baking Powder
1/4 tsp Salt
1 C Sugar
2 sticks Unsalted Butter, cold, cut into chunks
1 Egg
1 tsp Vanilla

Method:
1. Preheat oven to 350 degrees and line baking sheets with parchment paper.
2. In a medium bowl, combine flour, baking powder and salt. Mix well.
3. In the bowl of a stand mixer, combine sugar and butter and mix on medium speed until well combined.
4. Add egg and vanilla and mix well.
5. Gradually add flour mixture, scraping sides of bowl as needed until dough comes together.
6. Place wax paper on countertop and lightly flour surface.
7. Take half of the cookie dough and knead together and roll out to about 1/4-inch thickness with rolling pin.
8. Cut out snowflakes with cookie cutters and place onto prepared cookie sheet about 1 inch apart.


9. Place cookies into refrigerator for 20 minutes to chill. This will help the cookies keep their shape when baking.
10. Bake for 10 - 12 minutes.
11. Allow cookies to cool on pans for 5 minutes, then remove to wire racks to continue cooling.


12. Once cookies are cool, decorate with royal icing and sprinkles. Makes 2 - 3 dozen, depending on the size.

Royal Icing

For the icing:

4 C Confectioners’ Sugar

1/4 C Meringue Powder

1/2 Scant Cup Water


To decorate:

Piping Bags

Piping Tip – small round Wilton No.2

Squeeze Bottles

Gel Coloring

Sprinkles

Method:
1. In the bowl of a stand mixer, combine confectioners’ sugar and meringue powder and mix on low.
2. Add water and beat on medium speed for 5 - 7 minutes until icing is fluffy and stiff peaks form.
3. Place icing in plastic airtight containers until ready to use. Portion out icing into separate containers, using 1 container for each color you plan to use. It is best to work with about 1 cup of icing at a time.
4. Use a toothpick and a small amount of gel coloring to tint icing.
5. To pipe details or outlines on cookies, place a small amount of icing in piping bag fitted with No. 2 round tip. Gently squeeze icing and trace the outline of your cookie or pipe snowflake details. Allow outlines to dry for about 20 minutes before flooding.


6. To flood cookies, thin the icing with 1 teaspoon water at a time. Stir icing with small spatula and continue to add water as necessary to reach desired flooding consistency. If you lift your spatula and the icing drips and falls back into itself after about 7 seconds, it is a good consistency. Makes enough to decorate 2 - 3 dozen cookies.


XOXO Katie

Original Recipe from: Mobile Bay Mag

***************************************************************

Thank you so much Katie! I am definitely going to give these cookies a try!

Join us tomorrow for the 6th Day of Christmas Cookies: 
Julie's Peanut Butter Blossoms!

Wednesday, December 11, 2013

4th Day of Christmas Cookies: Trish's Chocolate Peppermint Pinwheel Cookies

Welcome to the 4th Day of the 12 Days of Christmas Cookies!


Today, a very dear friend of mine, Trish Niemitz, 
is sharing a festive cookie recipe, you simply NEED to try! 

In case you don't know, Trish is an excellent cook! 
She is even a member of a local gourmet cook club! 
Dinner at the Niemitz house is always a huge privilege!  

Trish has also had a big impact on my life. 
Throughout college she was a spiritual mentor for me. 
I am so grateful for the time she has invested in me. 
Thank you Trish, for your friendship, and thank you for sharing this recipe!

******************************************************************

Chocolate Peppermint Pinwheel Cookies


Shopping List:

1 batch Sugar Cookies, recipes follows

3 oz unsweetened chocolate, melted

1 tsp vanilla extract

1 egg yolk

1 tsp peppermint extract

1/2 C crushed candy canes or peppermint candies
Method:
1. Divide the dough in half (see recipe below) and add chocolate and vanilla to 1/2 and incorporate with hands

2. Add egg yolk, peppermint extract, and crushed candy to the other half of dough and incorporate with hands. 


3. Cover both with plastic and chill for approx. 5 min.
4. Roll out doughs separately to approx. 1/4-inch thickness.
5. Place peppermint dough on top of chocolate and press together around edges.


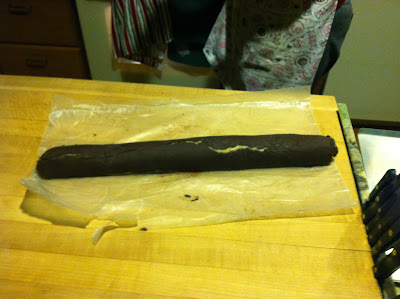
6. Using waxed paper or flexible cutting board underneath, roll dough into log.


7. Wrap in wax paper and refrigerate for 2 hours.
8. Preheat oven to 375 deg.
9. Remove dough from the fridge and cut into 1/2-inch slices.  


10. Place cookies 1 inch apart on greased baking sheet, parchment, or silicone baking mat and bake for 12-13 min., rotating the pan halfway through cooking time.  
11. Remove from oven and let sit on baking sheet for 2 min., then move to wire rack to cool completely.  Store in airtight container for up to a week.

Sugar cookie

3 C all purpose flour

3/4 tsp baking powder

1/4 tsp salt

1 C unsalted butter, softened

1 C sugar

1 egg, beaten

1 Tbsp milk

Powdered sugar, for rolling out dough

Method:
1. Sift together flour, baking powder, and salt.  Set aside.  Place butter and sugar in large bowl of electric stand mixer and beat until light in color.  Add egg and milk and beat to combine.  
2. Put mixer on low speed, gradually add flour, and beat until mixture pulls away from the side of the bowl.  
3. Divide the dough in half, wrap in waxed paper, and refrigerate for 2 hours. 

XOXO Trish

************************************************************

I can't believe how much fun this has been! 
I hope you're enjoying it as much as I am! 
I'll see ya tomorrow for the 5th day of Christmas Cookies: 
They are maybe the most beautiful cookies I have seen. 
Ever.

Tuesday, December 10, 2013

3rd Day of Christmas Cookies: Christmas Toffee Bark

Today on Day 3 of the 12 Days of Christmas Cookies,


my MOM is sharing a recipe for Toffee Bark recipe 
from Brown Eyed Baker that she "Christmasfied" 
(yes that is a word, well maybe not, but it is now). 

This is another simple, yet super festive and delicious recipe 
for your next holiday party. Check it out!

************************************************************
Christmas Toffee Bark:


Shopping List:

14 oz dark chocolate, finely chopped

Peppermint Extract, to taste

¾ C broken pretzel pieces, divided

¾ C Heath toffee pieces, divided

7 oz white chocolate, finely chopped

1/2 C Red and Green Chocolate Morsels

Method:
1. Line a baking sheet with parchment paper or a silicone baking mat.
2. In a double boiler or in a microwave on low power, melt the dark chocolate, stirring until the chocolate is smooth. Remove from the heat, and stir in ½ cup of the pretzel pieces, ½ cup of the toffee pieces, and peppermint extract to taste. Spread the mixture on the prepared baking sheet. Refrigerate for at least 30 minutes.
3. Melt the white chocolate in the same manner as you did the dark chocolate, stirring until completely smooth. Remove the baking sheet from the refrigerator and spread the white chocolate on top of the hardened dark chocolate layer. Sprinkle with the remaining pretzel pieces, toffee, and red and green chocolate morsels, using your palm to lightly press them into the white chocolate. Return the pan to the refrigerator for at least 30 minutes.
4. Use a sharp knife to cut the bark into pieces. Store in the refrigerator in an airtight container.
XOXO Sue
********************************************************
Thanks so much Mom, for sharing! 
And thanks for being one of the biggest inspirations in my life!


I was looking for a pic of my mom and me, 
but decided to share this pic of our whole fam!

Monday, December 9, 2013

2nd Day of Christmas Cookies: Peppermint Crinkle Cookies

This 12 Days of Christmas Cookies is the best!
In case you missed the 1st Day of Christmas Cookies 
which was Tessa's Lemon Cookies, click HERE to check it out. 
They seriously look so yummy! 

Today is the 2nd Day of the 12 Days of Christmas Cookies!

And on the 2nd Day of Christmas Cookies, 
I am sharing a recipe for Peppermint Crinkle cookies! 
These are one of my favorite Christmas cookies. 
So festive looking, delicious tasting, and peppermint just screams Christmas! 

These babies are so easy to make. 
Mix up the dough a head of time and stick it in the refrigerator 
until you are ready to roll them out bake em! 
A perfect make-ahead recipe so you can relax and enjoy your people on Christmas!

Peppermint Crinkle Cookies


Shopping List:

1/2 C Unsweetened Cocoa Powder

1 C Granulated Sugar

1 tsp Vanilla Extract

1/4 C Vegetable Oil

1/2 tsp Peppermint Extract

2 eggs

1 C All-Purpose Flour

1 tsp Baking Powder

1/4 tsp Salt

1 C Powdered Sugar


Method:
1. Mix together cocoa, sugar, vanilla, vegetable oil, and peppermint extract. Beat in egg one at a time.
2. In a separate bowl, sift together flour, baking soda, and salt.
3. Little by little, mix dry ingredients into wet ingredients. Chill at least 4 hours.
4. Roll tbsp-sized dough balls in your hands and drop into a bowl of powdered sugar to coat. When coated, flatten dough ball into disc.
5. Place on greased non-stick baking sheet or baking sheet covered in parchment paper.
6. Bake at 350 for 10-12 mins, or until cookie has begun cracking on top.
7. Allow to cool 2-3 mins after removing from oven before transferring to a baking sheet. Enjoy!

XOXO Lauren

Sunday, December 8, 2013

1st Day of Christmas Cookies: Tessa's Lemon Cookies

Ok, let's just get this out of the way...

I AM THE WORLD'S WORST BLOGGER!

Ok we did that. 
Apologizes that I haven't blogged in few weeks, and 
I completely missed Thanksgiving! Ah!

But moving on to The Most Wonderful Time of the Year! 

I've got tons of great stuff to share with you to help you celebrate 
and get into the Christmas spirit! 

And one thing I am MOST excited about is that we will be 
celebrating the 12 Days of Christmas Cookies


That's right! starting today, thru December 20th, 
we will be sharing some AWESOME Christmas cookie recipes! 
And the best part? 
I won't be the only one sharing! 
Nope! 
Some of the dear women in my life have volunteered
 to contribute some of their favorite cookie recipes! 
I can hardly wait to get started! 

But let's do it! 
Today, my good friend Tessa is kicking off this party! 

Matt and I met Tessa and her husband Ryan 
not long after we moved to Ohio through our church small group. 
They quickly became some of our closest friends in town. 
We love, Love, LOVE hanging out with the Gilmers. 

Ryan and Tessa also have an almost 6 month 
old precious baby girl, Regan! 


Aren't they just the cutest little family?! 

Check out Tessa's Lemon Cookies! Yum, yum YUM!

**************************************************************
Since having Regan, Ryan and I have had baking dates 
in an effort to spend some special time together while still caring for Baby Rey.  
Ryan and I chose a recipe from his Great Grandpa Bob Miller to share.  
This is the recipe:


Tessa's Lemon Cookies


Shopping List:

2 C sugar

1 C butter

1 T grated lemon peel

1/4 tsp. vanilla

2 eggs

3 1/2 C flour

1 tsp salt

1 tsp baking soda

1 tsp cream of tartar

Method:
1.  Blend first 6 ingredients.
2.  Stir in last 4 ingredients.
3.  Chill 1 hour.
4.  Form into small spoonfuls.
5.  Dip in sugar.
6.  Bake at 325 for 15 minutes.

They really seemed to enjoy sugar and butter, 
so I would suggest cutting down a bit on both!  
The first batch we (Ryan) made the spoonfuls way too big, 
and because they bake at such a low temperature, 
they just turned into one massive cookie that didn't bake all the way through.  

The next batch we filled our cookie scoop about 3/4 full 
and the cookies came out much better.  
You can always leave them in a bit longer depending on your oven.  

Merry Christmas and happy eating!

XOXO Tessa

************************************************************

Thanks so much for sharing Tessa! 

I seriously can't get over how fun this is going to be! 

See you tomorrow for the 
2nd Day of Christmas Cookies: Christmas Crinkle Cookies!

Friday, November 8, 2013

Busy Busy Week!

I apologize that I have not been blogging 
this week and today... what should be Week #9 of Pumpkin Fall Fridays, 
I have to postpone until next week. 

Unfortunately this has been the CRAZIEST week of my year. 
I will be back next week when we will have TWO Pumpkin Fall Friday recipes 
in ONE week! Have a great weekend and see you then, Friends!

Until then, click HERE for some
that are quick and easy to make!

Friday, November 1, 2013

Week #9 Pumpkin Whoopie Pies

Ahhhh November! 
How glad I am to see you! 

Halloween was such a fun holiday, 
but I'm ready to move on to Thanksgiving 
and then of course CHRISTMAS!! 

I'll try to keep my Christmas cheer to a minimum until after Thanksgiving. 
But maybe just a few recipes?? Please?? 

Ok back to Pumpkin Fall Friday
Can you believe its Week #9?! 
And the worst part is we only have 3 weeks left!! 

Well today I am absolutely crazy about our recipe. 
Maybe, just maybe my favorite so far. 
I mean who can resist a whoopie pie?! 
What could be better?! 
Let me tell you... PUMPKIN Whoopie Pies!  

Thanks All Recipes for this Ahhh mazing recipe!

Pumpkin Whoopie Pies


Shopping List:

2 C Brown Sugar, packet

1 C Vegetable Oil

1 1/2 C Solid Pack Pumpkin Puree

2 Eggs

3 C All-Purpose Flour

1 tsp Salt

1 tsp Baking Powder

1 tsp Baking Soda

1 tsp Vanilla Extract

1 1/2 Tbsp Ground Cinnamon

1/2 Tbsp Ground Ginger

1/2 Tbsp Ground Cloves

1 Egg White

2 Tbsp Milk

1 tsp Vanilla Extract

2 C Confectioners' Sugar

3/4 C Shortening

Method:

  1. Preheat oven to 350. Lightly grease baking sheets.
  2. Combine the oil and brown sugar. Mix in the pumpkin and eggs, beating well. Add the flour, salt, baking powder, baking soda, 1 teaspoon vanilla, cinnamon, ginger and cloves. Mix well.
  3. Drop dough by heaping teaspoons onto the prepared baking sheets. Bake at 350 for 10-12 mins. Cool cookies completely and  make sandwiches from two cookies filled with Whoopie Pie Filling.
  4. Whoopie Pie Filling: Beat egg white and mix with the milk, 1 tsp vanilla and 1 cup of the confectioners' sugar. Mix well then beat in the shortening and the remaining cup of confectioners' sugar. Beat until light and fluffy.
I really thought whoopie pies were much more difficult to make. 
I was so pleasantly surprised by how easy this recipe was to make. 
And they are SO SO Good!!

Happy November, Friends!